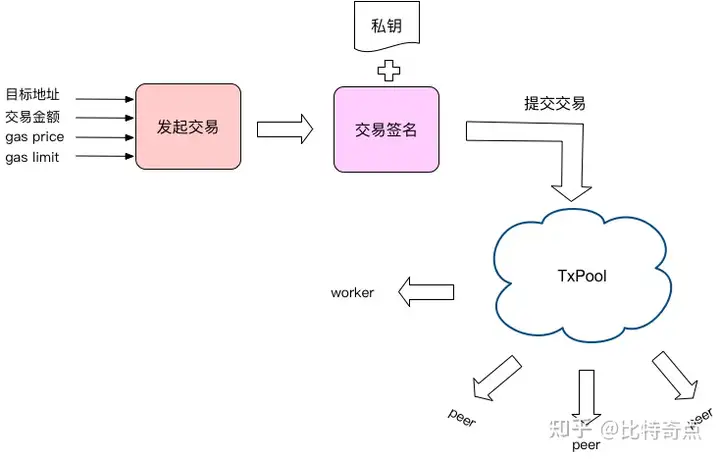
文分析以太坊交易的相关代码,以太坊交易的完整流程分为以下步骤:
发起交易:指定目标地址和交易金额,以及需要的 gas/gaslimit交易签名:使用账户私钥对交易进行签名提交交易:把交易加入到交易缓冲池 txpool(会先对交易签名进行验证)广播交易:通知 EVM 执行,同时把交易信息广播给其他结点
太坊交易流程图:
1. 发起交易
用户通过 JSON RPC 发起 eth_sendTransaction 请求,最终会调用 PublicTransactionPoolAPI 的实现,代码位于internal/ethapi/api.go:
func (s *PublicTransactionPoolAPI) SendTransaction(ctx context.Context, args SendTxArgs) (common.Hash, error) {
// Look up the wallet containing the requested signer
account := accounts.Account{Address: args.From}
wallet, err := s.b.AccountManager().Find(account)
if err != nil {
return common.Hash{}, err
}
if args.Nonce == nil {
// Hold the addresses mutex around signing to prevent concurrent assignment of
// the same nonce to multiple accounts.
s.nonceLock.LockAddr(args.From)
defer s.nonceLock.UnlockAddr(args.From)
}
// Set some sanity defaults and terminate on failure
if err := args.setDefaults(ctx, s.b); err != nil {
return common.Hash{}, err
}
// Assemble the transaction and sign with the wallet
tx := args.toTransaction()
var chainID *big.Int
if config := s.b.ChainConfig(); config.IsEIP155(s.b.CurrentBlock().Number()) {
chainID = config.ChainId
}
signed, err := wallet.SignTx(account, tx, chainID)
if err != nil {
return common.Hash{}, err
}
return submitTransaction(ctx, s.b, signed)
}
首先根据from地址查找到对应的wallet,检查一下参数值,然后做了以下3件事:
通过SendTxArgs.toTransaction()创建交易通过Wallet.SignTx()对交易进行签名通过submitTransaction()提交交易
这里先分析创建交易部分。先看一下SendTxArgs类型的定义(internal/ethapi/api.go):
type SendTxArgs struct {
From common.Address `json:"from"`
To *common.Address `json:"to"`
Gas *hexutil.Uint64 `json:"gas"`
GasPrice *hexutil.Big `json:"gasPrice"`
Value *hexutil.Big `json:"value"`
Nonce *hexutil.Uint64 `json:"nonce"`
// We accept "data" and "input" for backwards-compatibility reasons. "input" is the
// newer name and should be preferred by clients.
Data *hexutil.Bytes `json:"data"`
Input *hexutil.Bytes `json:"input"`
}
可以看到是和JSON字段相应的,包括了地址、gas、金额这些交易信息,nonce是一个随账户交易次数自增的数字,一般会自动填充。交易还可以携带一些额外数据,存放在data或者input字段中,推荐用input,data是为了向后兼容。
接着看一下它的toTransaction()函数:
func (args *SendTxArgs) toTransaction() *types.Transaction {
var input []byte
if args.Data != nil {
input = *args.Data
} else if args.Input != nil {
input = *args.Input
}
if args.To == nil {
return types.NewContractCreation(uint64(*args.Nonce), (*big.Int)(args.Value), uint64(*args.Gas), (*big.Int)(args.GasPrice), input)
}
return types.NewTransaction(uint64(*args.Nonce), *args.To, (*big.Int)(args.Value), uint64(*args.Gas), (*big.Int)(args.GasPrice), input)
}
可以看到,如果目标地址为空的话,表示这是一个创建智能合约的交易,调用NewContractCreation()。否则说明这是一个普通交易,调用NewTransaction()。不管调用哪个,最终都会生成一个Transaction实例,我们看一下Transaction类型的定义,代码位于core/types/transaction.go:
type Transaction struct {
data txdata
// caches
hash atomic.Value
size atomic.Value
from atomic.Value
}
主要就是包含了一个txdata类型的字段,其他3个都是缓存。看一下txdata类型的定义:
type txdata struct {
AccountNonce uint64 `json:"nonce" gencodec:"required"`
Price *big.Int `json:"gasPrice" gencodec:"required"`
GasLimit uint64 `json:"gas" gencodec:"required"`
Recipient *common.Address `json:"to" rlp:"nil"` // nil means contract creation
Amount *big.Int `json:"value" gencodec:"required"`
Payload []byte `json:"input" gencodec:"required"`
// Signature values
V *big.Int `json:"v" gencodec:"required"`
R *big.Int `json:"r" gencodec:"required"`
S *big.Int `json:"s" gencodec:"required"`
// This is only used when marshaling to JSON.
Hash *common.Hash `json:"hash" rlp:"-"`
}
可以看到,除了刚刚那些参数值,还有3个签名字段和1个hash字段。需要注意的是,from地址并不包含在该结构中。
2. 交易签名
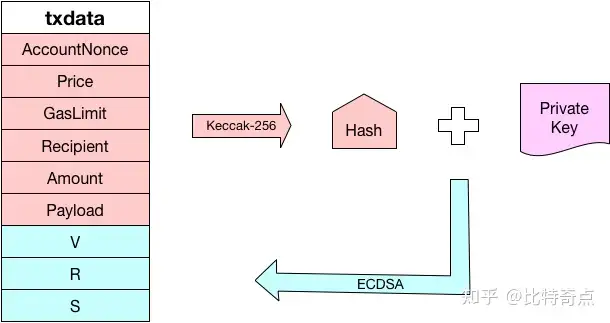
创建完Transaction实例以后,会调用Wallet.SignTx()进行签名。具体流程参见下图:
可以看到,是先通过Keccak-256算法计算交易数据的hash值,然后结合账户的私钥,通过ECDSA(Elliptic Curve Digital Signature Algorithm),也就是椭圆曲线数字签名算法生成签名数据。
这里有个疑问,为什么txdata里只有接收方的地址(Recipient),没有发送方的地址呢?那我们如何知道这笔交易的发起人时谁呢?实际上发送方的地址是可以根据交易数据以及签名推算出来的,参见下图:
至于为什么不把发送方地址放到txdata中,是为了故意隐藏发送方信息,还是为了减小数据量,就不得而知了。
下面开始分析代码。上一篇文章分析过,Wallet是一个接口,具体实现在keyStoreWallet中,代码位于accounts/keystore/keystore_wallet.go中:
func (w *keystoreWallet) SignTx(account accounts.Account, tx *types.Transaction, chainID *big.Int) (*types.Transaction, error) {
// Make sure the requested account is contained within
if account.Address != w.account.Address {
return nil, accounts.ErrUnknownAccount
}
if account.URL != (accounts.URL{}) && account.URL != w.account.URL {
return nil, accounts.ErrUnknownAccount
}
// Account seems valid, request the keystore to sign
return w.keystore.SignTx(account, tx, chainID)
}
继续跟踪KeyStore的SignTx()函数,代码位于accounts/keystore/keystore.go中:
func (ks *KeyStore) SignTx(a accounts.Account, tx *types.Transaction, chainID *big.Int) (*types.Transaction, error) {
// Look up the key to sign with and abort if it cannot be found
ks.mu.RLock()
defer ks.mu.RUnlock()
unlockedKey, found := ks.unlocked[a.Address]
if !found {
return nil, ErrLocked
}
// Depending on the presence of the chain ID, sign with EIP155 or homestead
if chainID != nil {
return types.SignTx(tx, types.NewEIP155Signer(chainID), unlockedKey.PrivateKey)
}
return types.SignTx(tx, types.HomesteadSigner{}, unlockedKey.PrivateKey)
}
这里会首先判断账户是否已经解锁,如果已经解锁的话就可以获取它的私钥。
然后创建签名器,如果要符合EIP155规范的话,需要把chainID传进去,也就是我们的“--networkid”命令行参数。
最后调用一个全局函数SignTx()完成签名,代码位于core/types/transaction_signing.go:
func SignTx(tx *Transaction, s Signer, prv *ecdsa.PrivateKey) (*Transaction, error) {
h := s.Hash(tx)
sig, err := crypto.Sign(h[:], prv)
if err != nil {
return nil, err
}
return tx.WithSignature(s, sig)
}
主要分为3个步骤:
生成交易的hash值根据hash值和私钥生成签名把签名数据填充到Transaction实例中
2.1 生成交易的hash值
以EIP155Signer为例,代码如下:
func (s EIP155Signer) Hash(tx *Transaction) common.Hash {
return rlpHash([]interface{}{
tx.data.AccountNonce,
tx.data.Price,
tx.data.GasLimit,
tx.data.Recipient,
tx.data.Amount,
tx.data.Payload,
s.chainId, uint(0), uint(0),
})
}
func rlpHash(x interface{}) (h common.Hash) {
hw := sha3.NewKeccak256()
rlp.Encode(hw, x)
hw.Sum(h[:0])
return h
}
可以看到,先进行RLP编码,然后再用SHA3-256生成hash值。RLP是一种数据序列化方法,后面有时间再写文章分析。
2.2 根据hash值和私钥生成签名
crypto.Sign()函数代码位于crypto/signature_cgo.go:
// Sign calculates an ECDSA signature.
// The produced signature is in the [R || S || V] format where V is 0 or 1.
func Sign(hash []byte, prv *ecdsa.PrivateKey) (sig []byte, err error) {
if len(hash) != 32 {
return nil, fmt.Errorf("hash is required to be exactly 32 bytes (%d)", len(hash))
}
seckey := math.PaddedBigBytes(prv.D, prv.Params().BitSize/8)
defer zeroBytes(seckey)
return secp256k1.Sign(hash, seckey)
}
这里是通过ECDSA算法生成签名数据,水平有限就不继续分析了。最终会返回的签名是一个字节数组,按R / S / V的顺序排列。
2.3 填充签名数据
最后一步就是把签名数据的这3个值填充到Transaction结构中了,看一下WithSignature()函数,代码位于core/types/transaction.go:
func (tx *Transaction) WithSignature(signer Signer, sig []byte) (*Transaction, error) {
r, s, v, err := signer.SignatureValues(tx, sig)
if err != nil {
return nil, err
}
cpy := &Transaction{data: tx.data}
cpy.data.R, cpy.data.S, cpy.data.V = r, s, v
return cpy, nil
}
生成的签名数据是字节数组类型,需要通过signer.SignatureValues()函数转换成3个http://big.Int类型的数据,然后填充到Transaction结构的R / S / V字段上。可以瞄一眼这个转换函数:
func (fs FrontierSigner) SignatureValues(tx *Transaction, sig []byte) (r, s, v *big.Int, err error) {
if len(sig) != 65 {
panic(fmt.Sprintf("wrong size for signature: got %d, want 65", len(sig)))
}
r = new(big.Int).SetBytes(sig[:32])
s = new(big.Int).SetBytes(sig[32:64])
v = new(big.Int).SetBytes([]byte{sig[64] + 27})
return r, s, v, nil
}
第0~31字节是R,第32~63字节是S,第64位加上27就可以得到V。
3. 提交交易
签名完成以后,就需要调用submitTransaction()函数提交到交易缓冲池txpool中。
在分析代码之前,先看下TxPool中的几个重要字段:
pending map[common.Address]*txList // All currently processable transactions
queue map[common.Address]*txList // Queued but non-processable transactions
all map[common.Hash]*types.Transaction // All transactions to allow lookups
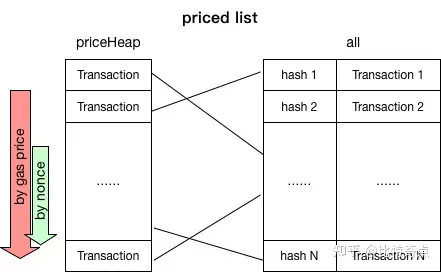
priced *txPricedList // All transactions sorted by price
pending字段中包含了当前所有可被处理的交易列表,而queue字段中包含了所有不可被处理、也就是新加入进来的交易。它们是按账号地址来组织的,每个地址对应一个txList,具体内部结构参见下图:
可以看到txList内部包含一个txSortedMap结构,实现按nonce排序,其内部维护了两张表:
一张是包含了所有Transaction的map,key是Transaction的nonce值。之前提到过,这个nonce是随着账户的交易次数自增的一个数字,所以越新的交易,nonce值越高。还有一张表是一个数组,包含了所有nonce值,其内部是进行过堆排序的(小顶堆),nonce值按照从大到小排列。每次调用heap.Pop()时会取出最小的nonce值,也就是最老的交易。
all字段中包含了所有的交易列表,以交易的hash作为key。
priced字段则是把all中的交易列表按照gas price从大到小排列,如果gas price一样,则按照交易的nonce值从小到大排列。最终的目标是每次取出gas price最大、nonce最小的交易。
我们提交交易的目标是:先把交易放入queue中记录在案,然后再从queue中选一部分放入pending中进行处理。如果发现txpool满了,则依据priced中的排序,剔除低油价的交易。
另外,如果是本地(local)提交的交易,默认情况下会尽可能地保证被放入txpool中,除非显式关闭该配置。
接着我们看一下txpool的默认配置:
var DefaultTxPoolConfig = TxPoolConfig{
Journal: "transactions.rlp",
Rejournal: time.Hour,
PriceLimit: 1,
PriceBump: 10,
AccountSlots: 16,
GlobalSlots: 4096,
AccountQueue: 64,
GlobalQueue: 1024,
Lifetime: 3 * time.Hour,
}
GlobalSlots:pending列表的最大长度,默认4096笔AccountSlots:pending中每个账户存储的交易数的阈值,超过这个数量可能会被认为是垃圾交易或者是攻击者,多余交易可能被丢弃GlobalQueue:queue列表的最大长度,默认1024笔AccountQueue:queue中每个账户允许存储的最大交易数,超过会被丢弃,默认64笔PriceLimit:允许进入txpool的最低gas price,默认1 GweiPriceBump:如果出现两个nonce相同的交易,gas price的差值超过该阈值则用新交易替换老交易
好,现在我们回到internal/ethapi/api.go,分析submitTransaction()函数:
func submitTransaction(ctx context.Context, b Backend, tx *types.Transaction) (common.Hash, error) {
if err := b.SendTx(ctx, tx); err != nil {
return common.Hash{}, err
}
if tx.To() == nil {
signer := types.MakeSigner(b.ChainConfig(), b.CurrentBlock().Number())
from, err := types.Sender(signer, tx)
if err != nil {
return common.Hash{}, err
}
addr := crypto.CreateAddress(from, tx.Nonce())
log.Info("Submitted contract creation", "fullhash", tx.Hash().Hex(), "contract", addr.Hex())
} else {
log.Info("Submitted transaction", "fullhash", tx.Hash().Hex(), "recipient", tx.To())
}
return tx.Hash(), nil
}
这里有一个Backend参数,是在eth Service初始化时创建的,具体实现在EthApiBackend中,代码位于eth/api_backend.go。可以看到,这里先调用了SendTx()函数提交交易,然后如果发现目标地址为空,表明这是一个创建智能合约的交易,会创建合约地址。下面分别进行分析。
3.1 提交交易到txpool
func (b *EthApiBackend) SendTx(ctx context.Context, signedTx *types.Transaction) error {
return b.eth.txPool.AddLocal(signedTx)
}
继续跟踪TxPool的AddLocal()函数:
func (pool *TxPool) AddLocal(tx *types.Transaction) error {
return pool.addTx(tx, !pool.config.NoLocals)
}
func (pool *TxPool) addTx(tx *types.Transaction, local bool) error {
pool.mu.Lock()
defer pool.mu.Unlock()
// Try to inject the transaction and update any state
replace, err := pool.add(tx, local)
if err != nil {
return err
}
// If we added a new transaction, run promotion checks and return
if !replace {
from, _ := types.Sender(pool.signer, tx) // already validated
pool.promoteExecutables([]common.Address{from})
}
return nil
}
这里有两个主要函数:add()和promoteExecuteables()。
add()会判断是否应该把当前交易加入到queue列表中,promoteExecuteables()则会从queue中选取一些交易放入pending列表中等待执行。下面分别讨论这两个函数。
3.1.1 TxPool.add()
这个函数比较长,我们分成一段一段的来分析:
// If the transaction is already known, discard it
hash := tx.Hash()
if pool.all[hash] != nil {
log.Trace("Discarding already known transaction", "hash", hash)
return false, fmt.Errorf("known transaction: %x", hash)
}
这一段是先计算交易的hash值,然后判断是不是已经在txpool 中,在的话就直接退出。
if err := pool.validateTx(tx, local); err != nil {
log.Trace("Discarding invalid transaction", "hash", hash, "err", err)
invalidTxCounter.Inc(1)
return false, err
}
这一段是验证交易的有效性,主要进行以下几个方面的检查:
数据量必须<32KB交易金额必须非负(>=0)交易的gas limit必须低于block的gas limit签名数据必须有效,能够解析出发送者地址交易的gas price必须高于pool设定的最低gas price(除非是本地交易)交易的nonce值必须高于当前链上该账户的nonce值(低于则说明这笔交易已经被打包过了)当前账户余额必须大于“交易金额 + gasprice * gaslimit”交易的gas limit必须大于对应数据量所需的最低gas水平
// If the transaction pool is full, discard underpriced transactions
if uint64(len(pool.all)) >= pool.config.GlobalSlots+pool.config.GlobalQueue {
// If the new transaction is underpriced, dont accept it
if !local && pool.priced.Underpriced(tx, pool.locals) {
log.Trace("Discarding underpriced transaction", "hash", hash, "price", tx.GasPrice())
underpricedTxCounter.Inc(1)
return false, ErrUnderpriced
}
// New transaction is better than our worse ones, make room for it
drop := pool.priced.Discard(len(pool.all)-int(pool.config.GlobalSlots+pool.config.GlobalQueue-1), pool.locals)
for _, tx := range drop {
log.Trace("Discarding freshly underpriced transaction", "hash", tx.Hash(), "price", tx.GasPrice())
underpricedTxCounter.Inc(1)
pool.removeTx(tx.Hash(), false)
}
}
这一段是在当前txpool已满的情况下,剔除掉低油价的交易。还记得之前有个priced字段存储了按gas price以及nonce排序的交易列表吗?这里会先把当前交易的gas price和当前池中的最低价进行比较:
如果低于最低价,直接丢弃该交易返回如果高于最低价,则从txpool中剔除一些低价的交易
// If the transaction is replacing an already pending one, do directly
from, _ := types.Sender(pool.signer, tx) // already validated
if list := pool.pending[from]; list != nil && list.Overlaps(tx) {
// Nonce already pending, check if required price bump is met
inserted, old := list.Add(tx, pool.config.PriceBump)
if !inserted {
pendingDiscardCounter.Inc(1)
return false, ErrReplaceUnderpriced
}
// New transaction is better, replace old one
if old != nil {
delete(pool.all, old.Hash())
pool.priced.Removed()
pendingReplaceCounter.Inc(1)
}
pool.all[tx.Hash()] = tx
pool.priced.Put(tx)
pool.journalTx(from, tx)
log.Trace("Pooled new executable transaction", "hash", hash, "from", from, "to", tx.To())
// Weve directly injected a replacement transaction, notify subsystems
go pool.txFeed.Send(TxPreEvent{tx})
return old != nil, nil
}
这一段是为了处理两个交易nonce相同的问题。如果用户发起了一笔交易,在还没有被执行之前又用同样的nonce发起了另一笔交易,则只会保留gas price高的那一笔。这个list.Overlaps()函数就是用来判断pending列表中是否包含相同nonce的交易的。
// New transaction isnt replacing a pending one, push into queue
replace, err := pool.enqueueTx(hash, tx)
if err != nil {
return false, err
}
如果之前的那些检查都没有问题,就真正调用enqueueTx()函数把交易加入到queue列表中了。
// Mark local addresses and journal local transactions
if local {
pool.locals.add(from)
}
pool.journalTx(from, tx)
最后,如果发现这个账户是本地的,就把它加到一个白名单里,默认会保证本地交易优先被加到txpool中。
至此,TxPool.add()函数就分析完了。
3.1.2 TxPool.promoteExecuteables()
这个函数比上面那个还长。。。主要目的是把交易从queue列表“提拔”到pending列表,代码逻辑比较清楚,具体可以参见下面这张图:
根据不同的目的可以分为3块,分别以粉色、紫色、绿色标识。
粉色部分主要是为了把queue中的交易“提拔”到pending中。当然在这之前需要先要进行一番检查:
丢弃nonce < 账户当前nonce的交易,也就是已经被打包过的交易丢弃转账金额 + gas消耗 > 账户余额的交易,也就是会out-of-gas的交易丢弃gas limit > block gas limit的交易,这部分交易可能会导致区块生成失败
紫色部分主要是为了清理pending列表,使其满足GlobalSlots和AccountSlots的限制条件:
如果有些账户的交易数超过了AccountSlots,则先按交易数最少的账户进行均衡。举例来说,如果有10个账户交易数超过了AccountSlots(默认16),其中交易数最少的账户包含20笔交易,那么先把其他9个账户的交易数量削减到20。如果经过上面的步骤,pending的长度还是超过了GlobalSlots,那就严格按照AccountSlots进行均衡,也就是把上面的10个账户的交易数进一步削减到16。
绿色部分主要是为了清理queue列表,使其满足GlobalQueue和AccountQueue的限制条件:
如果每个账户的交易数超过了AccountQueue,丢弃多余交易如果queue的长度超过了GlobalQueue,则把账户按最后一次心跳时间排序,然后依次去除账户中的交易,直到满足限制条件位置。
这里提到一个最后一次心跳时间,其实就是账户最近一次交易的时间,用来作为账户活跃度的判断
具体代码非常长,就不贴了,可以按照上面的图自行对照。
3.2 创建智能合约地址
再贴一下之前创建智能合约地址的代码:
addr := crypto.CreateAddress(from, tx.Nonce())
参数是发送方地址和交易的nonce值,然后调用CreateAddress()方法,代码位于crypto/crypto.go:
func CreateAddress(b common.Address, nonce uint64) common.Address {
data, _ := rlp.EncodeToBytes([]interface{}{b, nonce})
return common.BytesToAddress(Keccak256(data)[12:])
}
可以看到,就是先对刚刚两个参数进行RLP编码,然后计算hash值,取后20位作为合约地址。
至此,提交交易部分的代码就分析完了。
4. 广播交易
交易提交到txpool中后,还需要广播出去,一方面通知EVM执行该交易,另一方面要把交易信息广播给其他结点。具体调用在3.1.2节中提到的promoteTx()函数中,代码位于crypto/tx_pool.go:
func (pool *TxPool) promoteTx(addr common.Address, hash common.Hash, tx *types.Transaction) {
……
// Set the potentially new pending nonce and notify any subsystems of the new tx
pool.beats[addr] = time.Now()
pool.pendingState.SetNonce(addr, tx.Nonce()+1)
go pool.txFeed.Send(TxPreEvent{tx})
}
可以看到,先更新了最后一次心跳时间,然后更新账户的nonce值,最后一行就是发送一个TxPreEvent事件,外部可以通过SubscribeTxPreEvent()函数订阅该事件:
func (pool *TxPool) SubscribeTxPreEvent(ch chan<- TxPreEvent) event.Subscription {
return pool.scope.Track(pool.txFeed.Subscribe(ch))
}
我们只要搜索一下这个函数,就可以知道哪些组件订阅了该事件了。
4.1 执行交易
第一个订阅的地方位于miner/worker.go:
func newWorker(config *params.ChainConfig, engine consensus.Engine, coinbase common.Address, eth Backend, mux *event.TypeMux) *worker {
……
// Subscribe TxPreEvent for tx pool
worker.txSub = eth.TxPool().SubscribeTxPreEvent(worker.txCh)
……
go worker.update()
……
}
开启了一个goroutine来接收TxPreEvent,看一下update()函数:
func (self *worker) update() {
……
// Handle TxPreEvent
case ev := <-self.txCh:
// Apply transaction to the pending state if were not mining
if atomic.LoadInt32(&self.mining) == 0 {
self.currentMu.Lock()
acc, _ := types.Sender(self.current.signer, ev.Tx)
txs := map[common.Address]types.Transactions{acc: {ev.Tx}}
txset := types.NewTransactionsByPriceAndNonce(self.current.signer, txs)
self.current.commitTransactions(self.mux, txset, self.chain, self.coinbase)
self.updateSnapshot()
self.currentMu.Unlock()
} else {
// If were mining, but nothing is being processed, wake on new transactions
if self.config.Clique != nil && self.config.Clique.Period == 0 {
self.commitNewWork()
}
}
……
}
可以看到,如果结点不挖矿的话,这里会立即调用commitTransactions()提交给EVM执行,获得本地回执。
如果结点挖矿的话,miner会调用commitNewWork(),内部也会调用commitTransactions()执行交易。
4.2 广播给其他结点
另一个订阅的地方位于eth/handler.go:
func (pm *ProtocolManager) Start(maxPeers int) {
……
pm.txSub = pm.txpool.SubscribeTxPreEvent(pm.txCh)
go pm.txBroadcastLoop()
……
}
同样也是启动了一个goroutine来接收TxPreEvent事件,看一下txBroadcastLoop()函数:
func (pm *ProtocolManager) txBroadcastLoop() {
for {
select {
case event := <-pm.txCh:
pm.BroadcastTx(event.Tx.Hash(), event.Tx)
// Err() channel will be closed when unsubscribing.
case <-pm.txSub.Err():
return
}
}
}
继续跟踪BroadcastTx()函数:
func (pm *ProtocolManager) BroadcastTx(hash common.Hash, tx *types.Transaction) {
// Broadcast transaction to a batch of peers not knowing about it
peers := pm.peers.PeersWithoutTx(hash)
//FIXME include this again: peers = peers[:int(math.Sqrt(float64(len(peers))))]
for _, peer := range peers {
peer.SendTransactions(types.Transactions{tx})
}
log.Trace("Broadcast transaction", "hash", hash, "recipients", len(peers))
}
可以看到,这里会通过P2P向所有没有该交易的结点发送该交易。
智能合约开发、审计点击联系